Creating and Maintaining Xcode Templates
Hana Spolador
2023-03-06
4min
Development
Take your iOS development to the next level with custom Xcode project templates. Our guide covers everything you need to know to get started.


Share this blog:
This is the third and final installment of our blog series relating to Xcode templates.
In the previous blogs, we covered our custom solutions – now it’s time we show you how you can create your own! Check out the First and Second parts here.
We will provide you with a step-by-step guide on how to create and edit your own Xcode templates, allowing you to optimize your workflow and increase productivity when starting new projects.
Whether you're an experienced Xcode user or just starting out, read on to learn how to streamline your workflow with an Xcode template tailored to your specific needs.
Benefits of Xcode Templates
Now that we have introduced the topic of creating custom Xcode templates, it's worth exploring some of the benefits that come with using them.
Xcode templates are a powerful tool for improving your coding efficiency by providing pre-configured project and file setups that can save you time and effort when starting new projects.
While Xcode provides a number of default templates, creating custom templates can help you to tailor your project setups to meet your specific requirements, further increase your productivity and maintain consistency across your projects.
Using a custom Xcode template can be a huge productivity booster for both individual developers and development teams. It can help enforce certain standards and practices, making it easier for you and your team to work collaboratively.
By eliminating the need to write boilerplate code and configure build settings from scratch, custom templates can greatly reduce development time and effort, allowing developers to focus on what really matters: building high-quality applications.
Creating a Project Template
One of the simplest ways to create a new Xcode project template is starting from one of the default ones – duplicating it and customizing it to meet your specific needs.
First of all, you’ll need to locate the folder containing the shared Xcode templates. You can find it at the following path: /Applications/Xcode.app/Contents/Developer/Platforms/iPhoneOS.platform/Developer/Library/Xcode/Templates/Project Templates/iOS.
Duplicate a template you’d like to use as a base (e.g. App.xctemplate), and rename it.
After you’ve duplicated it, you don’t want to leave it in the folder with the default templates, as it will get overwritten with the next Xcode update. Instead, go to: ~/Library/Developer/Xcode/Templates. Create the Templates folder if it doesn’t exist already. This is where all your custom Xcode templates will be located.
Inside this Templates folder, create another folder for your new custom template. That’s where you’ll place the .xctemplate file that you previously duplicated.
Inside .xctemplate, locate the TemplateInfo.plist file, open it with Xcode and change the value for the key Identifier to a desired unique identifier of your template.
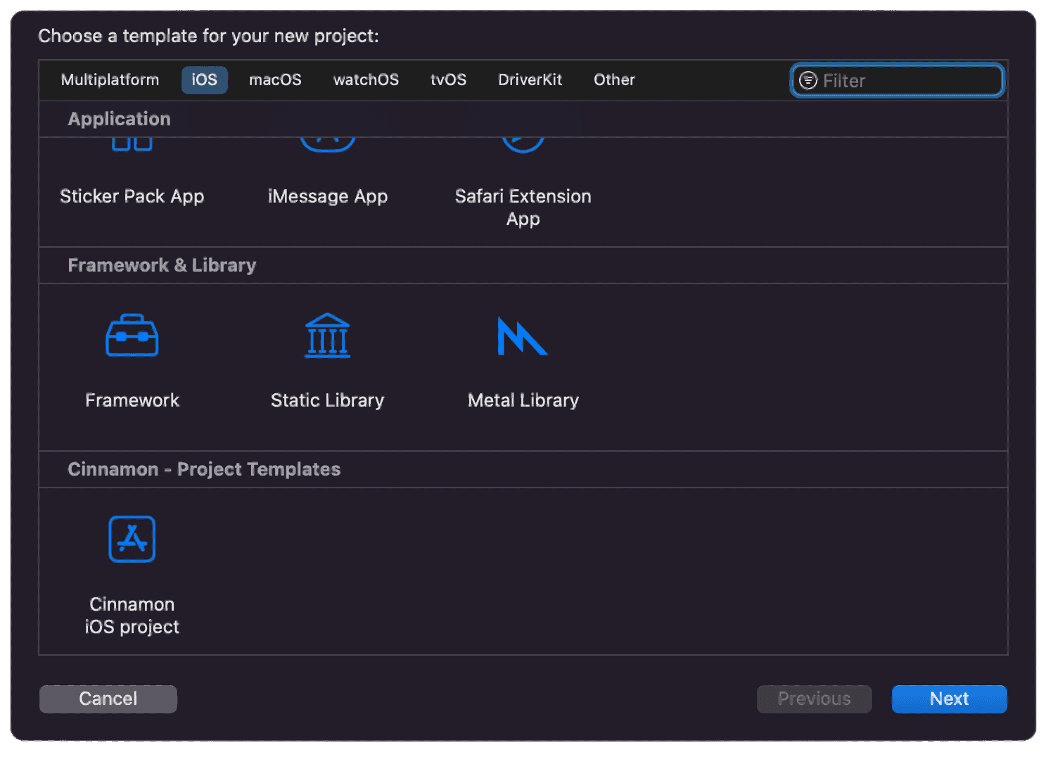
Check inside Xcode to see if your newly created template shows up in the template library when creating a new project:
Once you’ve successfully completed the previous steps, you’ll have a duplicate of a default template that you can start configuring to make it your own.
Understanding the Template’s Structure
Let’s take a look at what a template consists of – to gain a better understanding of how it works and what defines its behavior.
The template’s .xctemplate file is a folder in the form of a bundle that contains various resources and configuration files. If you take a look at its contents, you’ll see the TemplateInfo.plist file inside it. This is the main file you’ll need to edit in order to customize your template, as it’s the essential component that controls its behavior and output.
Apart from the TemplateInfo.plist file, this folder is also for all the custom files that will be a part of the template.
To create and modify custom Xcode templates, it’s important to understand the structure of the TemplateInfo.plist file.
This file is a property list file that contains all of the configuration information for the Xcode template. This includes the essential template information such as its name, description and the list of files to be included.
Open it with a text editor of your choice and take a look at its structure. You’ll notice some of the following keys:
Identifier – A unique string that identifies the template. It is usually defined in reverse domain name notation.
Kind – Specifies the kind of the template. E.g. Xcode.Xcode3.ProjectTemplateUnitKind for a project template, or Xcode.Xcode3.FileTemplateUnitKind for a file template.
Description – An optional key that can be used to provide a brief description of the template.
SortOrder – A value that specifies the order in which the template should be displayed inside the Xcode’s template library when the user is creating a new project or a new file.
Ancestors – An array of identifiers for templates that this template inherits from. E.g. used for adding storyboard or Core Data setup to the project.
Options – A dictionary that can be used to specify additional configuration options of the template that the user is prompted with. For example, allowing the user to choose the language (Swift or Objective-C), user interface (SwiftUI or Storyboard), platforms etc.
Nodes – Used to specify the structure of files and folders that are included in the template. You may want to modify this structure to include additional files or resources.
Dependencies – Specifies any necessary external dependencies that are needed for the template to work properly.
Adding Files and Folders
If you want to add files and folders to your project template, you’ll need to modify the Nodes and Definitions inside Units in the TemplateInfo.plist file.
Each file or folder in the structure is represented by a dictionary, including the file’s information such as its name, type, and path.
To include a file in the template, you’ll need to declare its location in Nodes, and its desired destination (within the generated project) in Definitions.
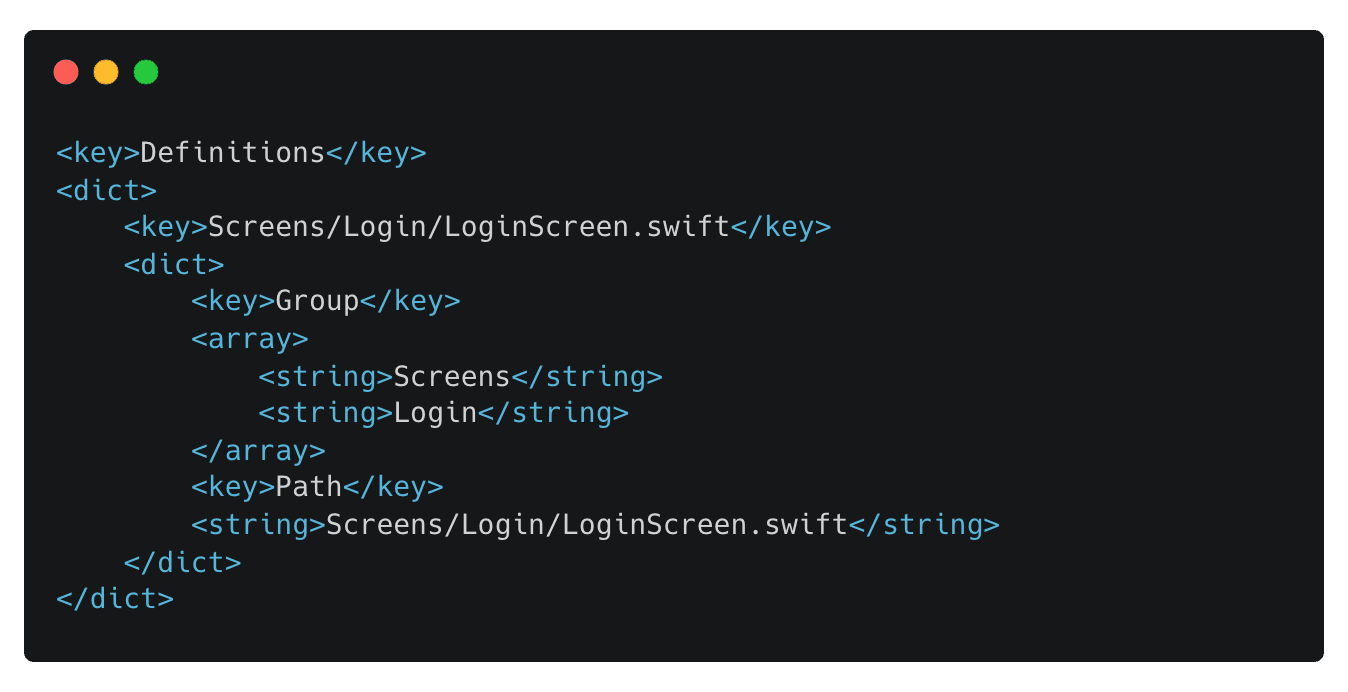
In the Definitions node, it will be necessary to define Path and Group.
Group is used to define a group or folder that can be reused across multiple files or folders in the Nodes, while Path specifies the location of the file or folder in the generated project.
Here’s an example of the Definitions node:
Wrapping Up
Custom Xcode templates can be a game-changer when it comes to developing iOS applications. They can significantly improve your development workflow, saving you time and increasing your productivity.
With a little effort, creating your own custom templates can greatly reduce time on repeating tasks and allow you to focus on building high-quality projects.
By following the steps outlined in this blog, you can easily create and customize Xcode templates tailored to your specific needs, ensuring consistency across all your projects.
We hope that this Xcode template series has been helpful and provided you with the knowledge needed to get started on developing your own templates. Keep exploring Xcode's features to further enhance your development efficiency and improve your workflow.
Remember to keep your templates up-to-date and to customize them to your specific needs. That way you can ensure that they remain relevant and continue to provide value over time.
Share this blog:
Subscribe to our newsletter
We send bi-weekly blogs on design, technology and business topics.