Cinnamon’s Next.js Template
Nikola Meheš
2022-08-01
7min
Development
In this blog series, Cinnamon will introduce the first set of team templates. We'll go over why we required a template and how each team customized it.


Share this blog:
Welcome to the first in a series of blogs where Cinnamon will present starter templates for each development team. We will try to explain how we got to the point where we needed a template and how each team structured it according to their needs.
Next.js Template-Introduction
Our Web team improved their process, and through years of growth, passing information by word of mouth and jumping from repo to repo was not working anymore. Therefore, we sat down during one of our monthly meetings and discussed what our template needed to have in order to kickstart our development. In this first part of the series of blogs, I will explain globally our project structure and why we decided to use Next.js in the first place, and go through the standard template used in creating public-facing websites.
Why are we using Next.js?
Working in an agency has its benefits, including the freedom to tackle new libraries, plugins, and ways of writing. Don’t get me wrong; you can’t just come and write something different from the rest of the team. But you can come to the team lead and say, "I’ve found a cool new library. It’s called React Query. I think we can improve our server calls and response management. What do you think?" And then, we discuss it and usually try it out on a smaller project. Once tested, results were presented to the team, and we discussed how and when to use them.
The same happened with Next.js as well. Over the course of two years, we first started using Next.js to improve our website. At the time, it was written in Angular using Angular Universal. Back then, we already had decent SEO experience with it, but the UX was not at a satisfactory level for a SPA. In addition, we had a bug that could not be solved at that time, a 200 ms white splash screen on the initial page load.
And as almost all of our team back then switched to React, the logical choice was to use Next.js as our platform of choice. At that moment, we had already used Next.js but didn’t have the rules set in stone. And we used this internal project to define the process.
Firstly, we created a list on paper of what we needed to include. Then, using the whiteboard, we agreed on the folder structure. We also knew that we would have almost everyone in our time working on the project at some point, so we created a detailed GIT policy and agreed on default PR reviewers. As well, we decided on the company's default VSC plugins and a prettier configuration. Why am I talking about all of this? Because creating a good template is more than just putting code in a git repo; it is a multi-step process that includes research, debate, testing, and writing.

Template itself
This final template we’re sharing went through multiple iterations over time, and we plan to provide everyone with a few more iterations depending on the integration.
In this part, the goal is to focus on the structure itself.
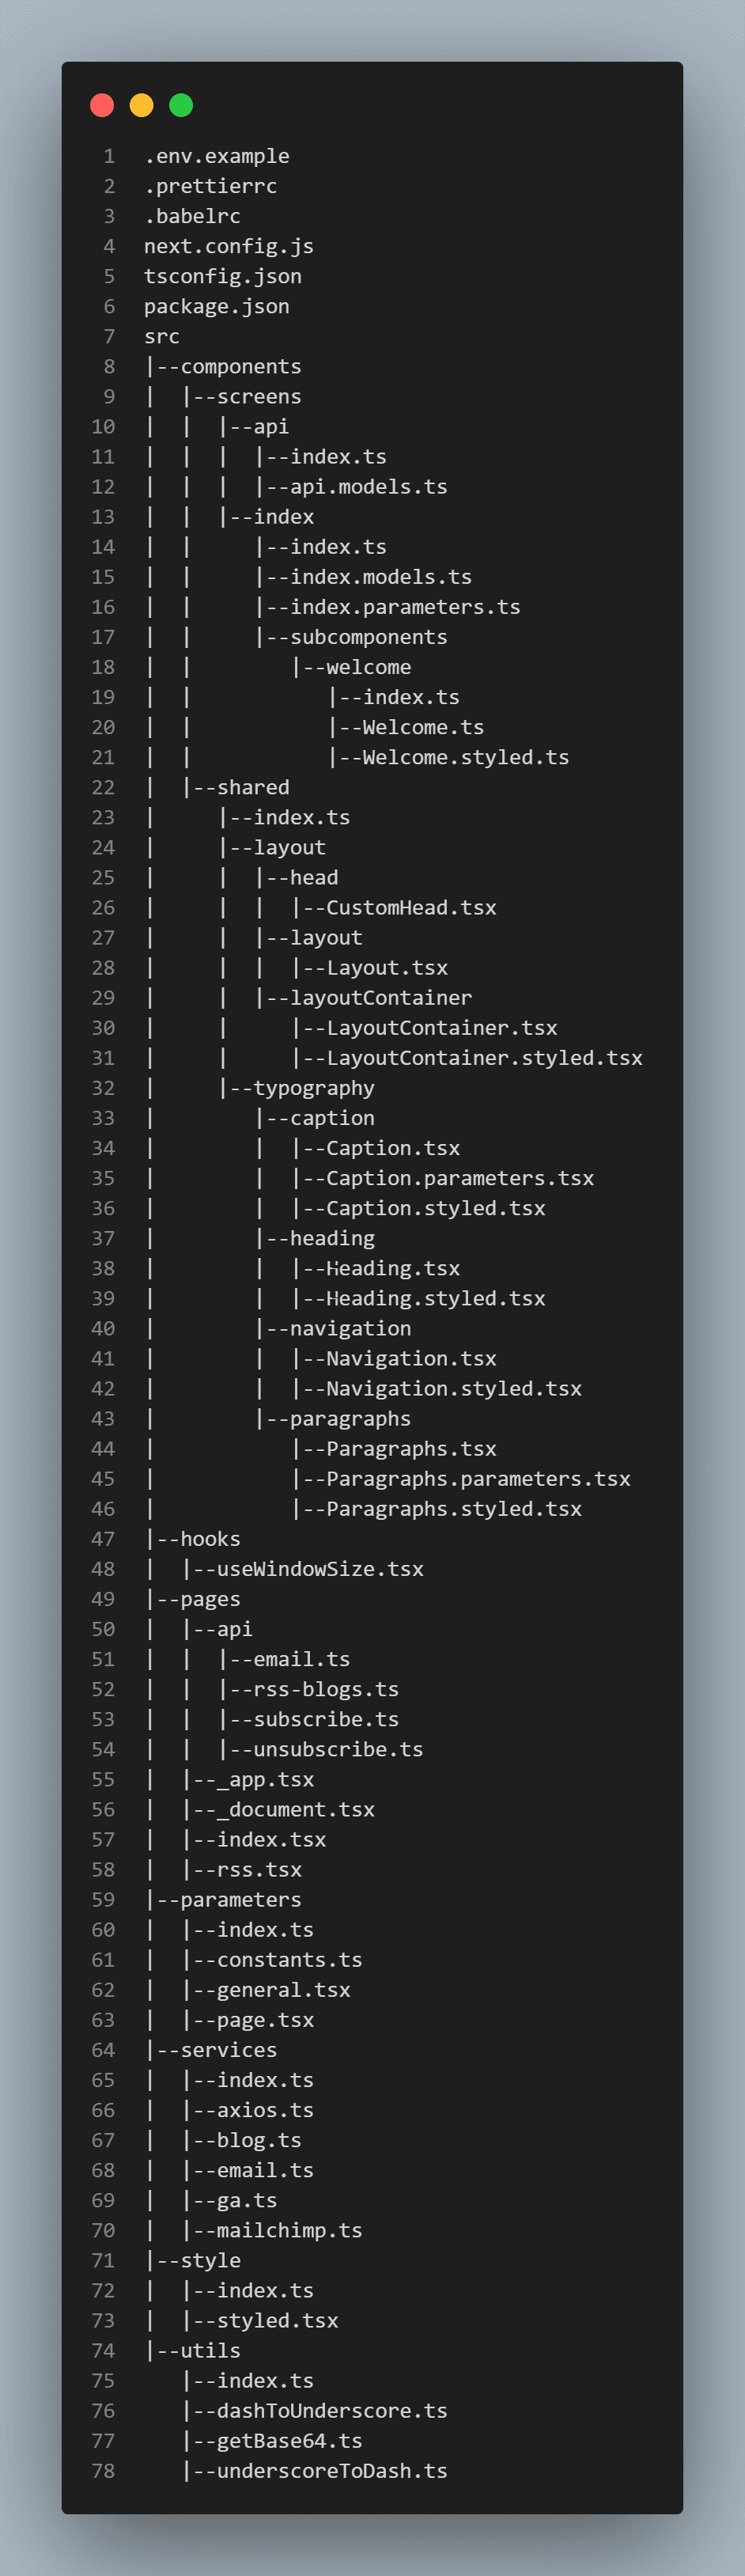
.env.example: In development, sometimes we don’t have a list of all services and keys immediately at the beginning of a project. And .env files tend to increase. As we are not sharing .env through the git repository, we are using this file to represent the latest version so the developer can see they need to update their local information about environment variables.
.prettierrc: As mentioned above, we agreed to use prettier to unify the code formatting in the team. And lately, we’ve incorporated husky to help us to eliminate manual formatting.
.babelrc: Inside, we’ve defined the usage of the emotion babel plugin based on the emotion library documentation.
Components: We have two separate subfolders directly under the component folder to distinguish each component's usage. The screens folder follows the default Next.js pages folder in which we’ve defined unique components tied to the page subfolder, its own models, and parameters. The second folder is shared, where we store all other components that can be used on multiple other components or pages.
Regarding the component itself, its folder can have up to three files
ComponentName.tsx : The main react component files with their own logic and definition.
ComponentName.parameters.tsx : Parameters uniquely tied to the particular component.
ComponentName.styled.tsx : We are separating the style from the component. This way, we can have the same logic with two or more different styles. As well, for styling, we are using the emotion library as the preferred way of writing styled components.
hooks : All custom hooks are stored in this folder. Hooks are bits of code using React features and using state without writing a class. They were introduced in React version 16.8 and have become the norm in React programming.
pages : Next.js out of the box provides routing. All pages with their names form routes on which end users can land. We have an additional api folder in which we can write server-side code, as Next.js is based on NodeJS. Also, the file name under the api folder represents the REST route. We are always trying to put all integration calls on the server side, so all keys and tokens are secured and not visible on the client machine, and we can better mutate data before it reaches the client. parameters : Inside this folder we are saving all constraints and constants. Everything from router pages, device types, screen sizes, and colors to default parameters for certain objects.
export const sizes = { mobileS: 320, mobileM: 375, mobileL: 425, tablet: 768, laptop: 1024, laptopL: 1440, desktop: 2560 };services : This folder contains all unique services, representing the logic of calling server-side or 3rd party requests. This way, we’ve separated the code more clearly, making it more readable and maintainable.
style : Mostly, we only have one file inside with a single confirmation where we are setting up global level styles.
utils : Folder with reusable functions.
In each folder, we include index.ts in which we export the defined content. We didn’t go into the setup where we define absolute folder paths in tsconfig.json.
export { dashToUnderscore } from './dashToUnderscore'; export { underscoreToDash } from './underscoreToDash'; export { getBase64 } from './getBase64';Default Dependencies
Prettier - this is an excellent code formatter used by the web development team. It can be manually added to the project via dependency or installed in Visual Studio Core as a plugin. In the template, we are including the configuration file saved in the project root folder in file .prettierrc. If you want to ignore formatting for some files, just define them in the .prettierignore file.
{ "useTabs": true, "tabWidth": 2, "printWidth": 150, "singleQuote": true, "trailingComma": "none", "jsxBracketSameLine": true, "semi": true, "arrowParens": "avoid" }Husky - Husky enables the precommit process. It is a lightweight library that adds git hooks to the commit command. Our default usage is always to run the prettier formatter, so even if the developer forgets to format, Husky will do it automatically.
Axios - You could use the out-of-the box fetch library, but we are prone to using Axios as everyone in the development team is highly used to it. We are using it both on the backend and on the frontend. More detailed usage will be explained later in upcoming blogs.
How to run our template?
To use our template, feel free to download it from our git repo
https://github.com/Cinnamon-Agency/template-nextjs
After you have downloaded the template, you will need to already have the yarn package manager.
Once yarn is installed, simply run
yarn installAfterward, it is as straightforward to use as a typical Next.js application.
yarn devTo run the project locally on port 3000, or run
yarn buildTo generate a production build.
In future releases, we will learn how to create a multi-environment setup from a single project folder, so keep in touch and subscribe to our newsletter.
Roadmap
As mentioned in the intro, we’ll have a series of blogs tied to this template. In addition, in the upcoming weeks, we will discuss how to use the Next.js server-side part more effectively, how we created primitive components to speed up development, and, in the end, look into different integrations and possibilities. In parallel, while releasing blogs tied to the Web team, you can expect blogs and templates from our iOS, Flutter, and Android teams.

Share this blog:
Subscribe to our newsletter
We send bi-weekly blogs on design, technology and business topics.