Building APIs with FastAPI Framework
Marijan B.
2021-03-11
11min
Development
We introduced the concept of the API database before. This time, we're showing one of the frameworks in the role of creating our API for COVID data.
FastAPI is a high-performance Python framework for building APIs. It is based on the OpenAPI standard for API creation, including declarations of path operations, parameters, body requests and security. A really nice feature is automatic data model documentation which makes it really usable in enterprise environments.
We will be creating a new directory for our project and setting up the virtual environment:
mkdir blog_fast_api
cd blog_fast_api
virtualenv --python=/usr/local/bin/python3.9 env
source env/bin/activate
Confirm with the command “pip --version” that our pip is linked with the newly created virtual environment (you should see the path into our blog_fast_api/env directory). If this is ok, we can install our packages.
pip install fastapi
pip install uvicorn
pip install databases
pip install 'databases[postgresql]'
pip install python-dotenv
pip install asyncpg
The fastapi package contains all of our API creation modules and the uvicorn package is basically the web server which our API will use. The databases package and its PostgreSQL flavour, together with asyncpg will support our async queries to Postgres DB which we installed in the previous blogpost. Package python-dotenv simply helps us define environment variables.
Create a new file called .env and open a text editor (such as Sublime Text, Notepad++, VIM, ...). Add this line to .env:
DATABASE_URL=postgresql://postgres:mysecretpassword@database:5432/postgres We need to add one file that will load the environment and initialize the database client. Create db.py and add the code:
import os
from databases import Database
from dotenv import load_dotenv
import sqlalchemy
BASE_DIR=os.path.dirname(os.path.abspath(__file__))
load_dotenv(os.path.join(BASE_DIR, ".env"))
db=Database(os.environ["DATABASE_URL"])
metadata=sqlalchemy.MetaData()
We use the load_dotenv to initialize the environment variable based on the .env file.
Let’s define a model based on our COVID data file. The file is downloadable here. It is generated by Our World in Data and is maintained on this github. Download it locally, as we will need it later on. Create a file called models.py and fill it with:
from app.db import db, metadata, sqlalchemy
from sqlalchemy.types import Date
from sqlalchemy import and_ owidCovidData=sqlalchemy.Table( "owid_covid_data", metadata, sqlalchemy.Column("iso_code", sqlalchemy.String), sqlalchemy.Column("continent", sqlalchemy.String), sqlalchemy.Column("location", sqlalchemy.String), sqlalchemy.Column("date", Date), sqlalchemy.Column("total_cases", sqlalchemy.Numeric), sqlalchemy.Column("new_cases", sqlalchemy.Numeric), sqlalchemy.Column("new_cases_smoothed", sqlalchemy.Numeric), sqlalchemy.Column("total_deaths", sqlalchemy.Numeric), sqlalchemy.Column("new_deaths", sqlalchemy.Numeric), sqlalchemy.Column("new_deaths_smoothed", sqlalchemy.Numeric), sqlalchemy.Column("total_cases_per_million", sqlalchemy.Numeric), sqlalchemy.Column("new_cases_per_million", sqlalchemy.Numeric), sqlalchemy.Column("new_cases_smoothed_per_million", sqlalchemy.Numeric), sqlalchemy.Column("total_deaths_per_million", sqlalchemy.Numeric), sqlalchemy.Column("new_deaths_per_million", sqlalchemy.Numeric), sqlalchemy.Column("new_deaths_smoothed_per_million", sqlalchemy.Numeric), sqlalchemy.Column("icu_patients", sqlalchemy.Numeric), sqlalchemy.Column("icu_patients_per_million", sqlalchemy.Numeric), sqlalchemy.Column("hosp_patients", sqlalchemy.Numeric), sqlalchemy.Column("hosp_patients_per_million", sqlalchemy.Numeric), sqlalchemy.Column("weekly_icu_admissions", sqlalchemy.Numeric), sqlalchemy.Column("weekly_icu_admissions_per_million", sqlalchemy.Numeric), sqlalchemy.Column("weekly_hosp_admissions", sqlalchemy.Numeric), sqlalchemy.Column("weekly_hosp_admissions_per_million", sqlalchemy.Numeric), sqlalchemy.Column("total_tests", sqlalchemy.Numeric), sqlalchemy.Column("new_tests", sqlalchemy.Numeric), sqlalchemy.Column("total_tests_per_thousand", sqlalchemy.Numeric), sqlalchemy.Column("new_tests_per_thousand", sqlalchemy.Numeric), sqlalchemy.Column("new_tests_smoothed", sqlalchemy.Numeric), sqlalchemy.Column("new_tests_smoothed_per_thousand", sqlalchemy.Numeric), sqlalchemy.Column("tests_per_case", sqlalchemy.Numeric), sqlalchemy.Column("positive_rate", sqlalchemy.Numeric), sqlalchemy.Column("tests_units", sqlalchemy.Numeric), sqlalchemy.Column("stringency_index", sqlalchemy.Numeric), sqlalchemy.Column("population", sqlalchemy.Numeric), sqlalchemy.Column("population_density", sqlalchemy.Numeric), sqlalchemy.Column("median_age", sqlalchemy.Numeric), sqlalchemy.Column("aged_65_older", sqlalchemy.Numeric), sqlalchemy.Column("aged_70_older", sqlalchemy.Numeric), sqlalchemy.Column("gdp_per_capita", sqlalchemy.Numeric), sqlalchemy.Column("extreme_poverty", sqlalchemy.Numeric), sqlalchemy.Column("cardiovasc_death_rate", sqlalchemy.Numeric), sqlalchemy.Column("diabetes_prevalence", sqlalchemy.Numeric), sqlalchemy.Column("female_smokers", sqlalchemy.Numeric), sqlalchemy.Column("male_smokers", sqlalchemy.Numeric), sqlalchemy.Column("handwashing_facilities", sqlalchemy.Numeric), sqlalchemy.Column("hospital_beds_per_thousand", sqlalchemy.Numeric), sqlalchemy.Column("life_expectancy", sqlalchemy.Numeric), sqlalchemy.Column("human_development_index", sqlalchemy.Numeric),
) class OwidCovidData: @classmethod async def get(cls, iso_code, continent, location, date): query=owidCovidData.select().where(and_(owidCovidData.c.iso_code==iso_code, owidCovidData.c.continent==continent, owidCovidData.c.location==location, owidCovidData.c.date==date)) data=await db.fetch_one(query) return data @classmethod async def create(cls, **data): query=owidCovidData.insert().values(**data) await db.execute(query) return{"status":"OK"} @classmethod async def update(cls, **data): query=owidCovidData.update().where(and_(owidCovidData.c.iso_code==data["iso_code"], owidCovidData.c.continent==data["continent"], owidCovidData.c.location==data["location"], owidCovidData.c.date==data["date"])).values(**data) await db.execute(query) return{"status":"OK"}
SQLAlchemy is an ORM tool that will help us define the data model within the programming language. The idea is to define all aspects of the API in one place and in one paradigm. This helps us with clarity of the codebase and also with database migrations - which is a feature that helps immensely if you have shared models between different environments and projects. To represent a database table, we use the Table class, together with the Metadata container (features of the database), and Column objects to define object attributes. The table is based on the owid-covid-data.csv file columns. To simplify, we will not define keys and constraints now, but this is a step that should not be missed. Here, it would be prudent to define it based on the future use case (scalability, multi-client access, etc.) - or the purpose of the API.
We define a class OwidCovidData that will contain methods to SELECT, INSERT or UPDATE the data (wording based on DB nomenclature). The Table object already has methods with the same name and we just need to connect them to the API wrapper. The function get is defined as an async, which is why we needed the asyncpg library. This allows us better control of asynchronous calls to the DB. We query the table through the set of columns we identified as unique (a good candidate for primary key definition). We need to define the same set for update as well. Bear in mind we implemented the query to fetch only one record. We would need to implement different logic in order to support searching with a partial key. The create method inserts a new record into the table. Now we will define the file schema.py:
from pydantic import BaseModel
import datetime class OwidCovidData(BaseModel): iso_code:str=None continent:str=None location:str=None date:datetime.date=None total_cases:float=None new_cases:float=None new_cases_smoothed:float=None total_deaths:float=None new_deaths:float=None new_deaths_smoothed:float=None total_cases_per_million:float=None new_cases_per_million:float=None new_cases_smoothed_per_million:float=None total_deaths_per_million:float=None new_deaths_per_million:float=None icu_patients:float=None new_deaths_smoothed_per_million:float=None icu_patients_per_million:float=None hosp_patients:float=None hosp_patients_per_million:float=None weekly_icu_admissions:float=None weekly_icu_admissions_per_million:float=None weekly_hosp_admissions:float=None weekly_hosp_admissions_per_million:float=None total_tests:float=None new_tests:float=None total_tests_per_thousand:float=None new_tests_per_thousand:float=None new_tests_smoothed:float=None new_tests_smoothed_per_thousand:float=None tests_per_case:float=None positive_rate:float=None tests_units:float=None stringency_index:float=None population:float=None population_density:float=None median_age:float=None aged_65_older:float=None aged_70_older:float=None gdp_per_capita:float=None extreme_poverty:float=None cardiovasc_death_rate:float=None diabetes_prevalence:float=None female_smokers:float=None male_smokers:float=None handwashing_facilities:float=None hospital_beds_per_thousand:float=None life_expectancy:float=None human_development_index:float=None class Config: orm_mode=True
Pydantic allows us to perform automatic data validation using python type annotations. In case of invalid data, we will get a user friendly error. While SQLAlchemy helps us to define the DB model, Pydantic defines the JSON schema which is the point of contact with the client. Those two can be different, hence the separate files. The orm_mode=True parameter allows Pydantic to automatically translate SQLAlchemy objects into responses.
Now we will connect the various components of our API, create a file called app.py and add this code:
from app.db import db
from fastapi import FastAPI app=FastAPI() @app.on_event("startup")
async def startup(): await db.connect() @app.on_event("shutdown")
async def shutdown(): await db.disconnect()
This file just defines a couple of prerequisite packages and implements methods for the DB client initialization. Let’s create the main API definition now. Create main.py file and add the following code:
import uvicorn
from app.app import app
from app.schema import OwidCovidData as SchemaOwidCovidData
from app.models import OwidCovidData as ModelOwidCovidData @app.get("/")
def read_root(): return{"Hello":"World"} @app.post("/owidCovidData")
async def create_data(data:SchemaOwidCovidData): status=await ModelOwidCovidData.create(**data.dict()) return status @app.get("/owidCovidData", response_model=SchemaOwidCovidData)
async def get_data(iso_code:str, continent:str, location:str, date:str): data=await ModelOwidCovidData.get(iso_code=iso_code, continent=continent, location=location, date=date) return SchemaOwidCovidData(**data).dict() @app.put("/owidCovidData")
async def update_data(inData:SchemaOwidCovidData): status=await ModelOwidCovidData.update(**inData.dict()) return status if __name__=="__main__": uvicorn.run(app, host="0.0.0.0", port=80)
The main script is actually very simple since we already defined all of the components in advance. All that is left is to define the POST route which invokes the create method and passes the whole request directly to the model. The GET method will pass our key to the get model method. The PUT method is basically a combination of create and get where we will send the whole request JSON to the model, and it will parse out and search over our 4 unique keys to find the records which need to be updated.
We will implement our API as a docker container so we need to define a Dockerfile with the proper recipe. Add a new file called Dockerfile:
FROM tiangolo/uvicorn-gunicorn-fastapi:latest COPY app.py db.py main.py models.py schema.py __init__.py requirements.txt .env ./app/ RUN pip install -r app/requirements.txt The easiest deployment would be to find an image with some of the requirements already installed. We found an image ( here) with pre installed uvicorn, Fastapi and with python3.8 in the latest deployment. Docker runs instructions in Dockerfile in order and it must begin with a FROM instruction, after which we note the underlying image we are going to use. We use the COPY command to instruct Docker to copy the API files to the image. The container specification expects the API files to be located in the /app folder. We copy the requirements.txt file as well which is a list of packages needed for our deployment and which we can generate with the command:
pip freeze >requirements.txtThe Dockerfile ends with the RUN command which will install all the needed additional packages for our API. First we need to build the image:
docker build -t blog_fast_api The image name will be blog_fast_api. We need to specify this name when deploying the container. Now we can deploy the API:
docker run -d --name c_blog_fast_api -p 80:80 --link=postgres-db:database blog_fast_apiWe run the container in detached mode, which means we will immediately be sent back to our command line. We specify the name of the container and the port mapping. One additional parameter we need to specify is the link between our API container and the DB container. We do this by specifying the name of the container we want to connect to and its alias in our API container. That alias is “database” and we specified it in the .env file as the hostname parameter in the URL. The last parameter is the name of the image we are using. Check the container with “docker ps” and if everything is ok, try opening up the browser and specifying the URL as localhost. The result should be:
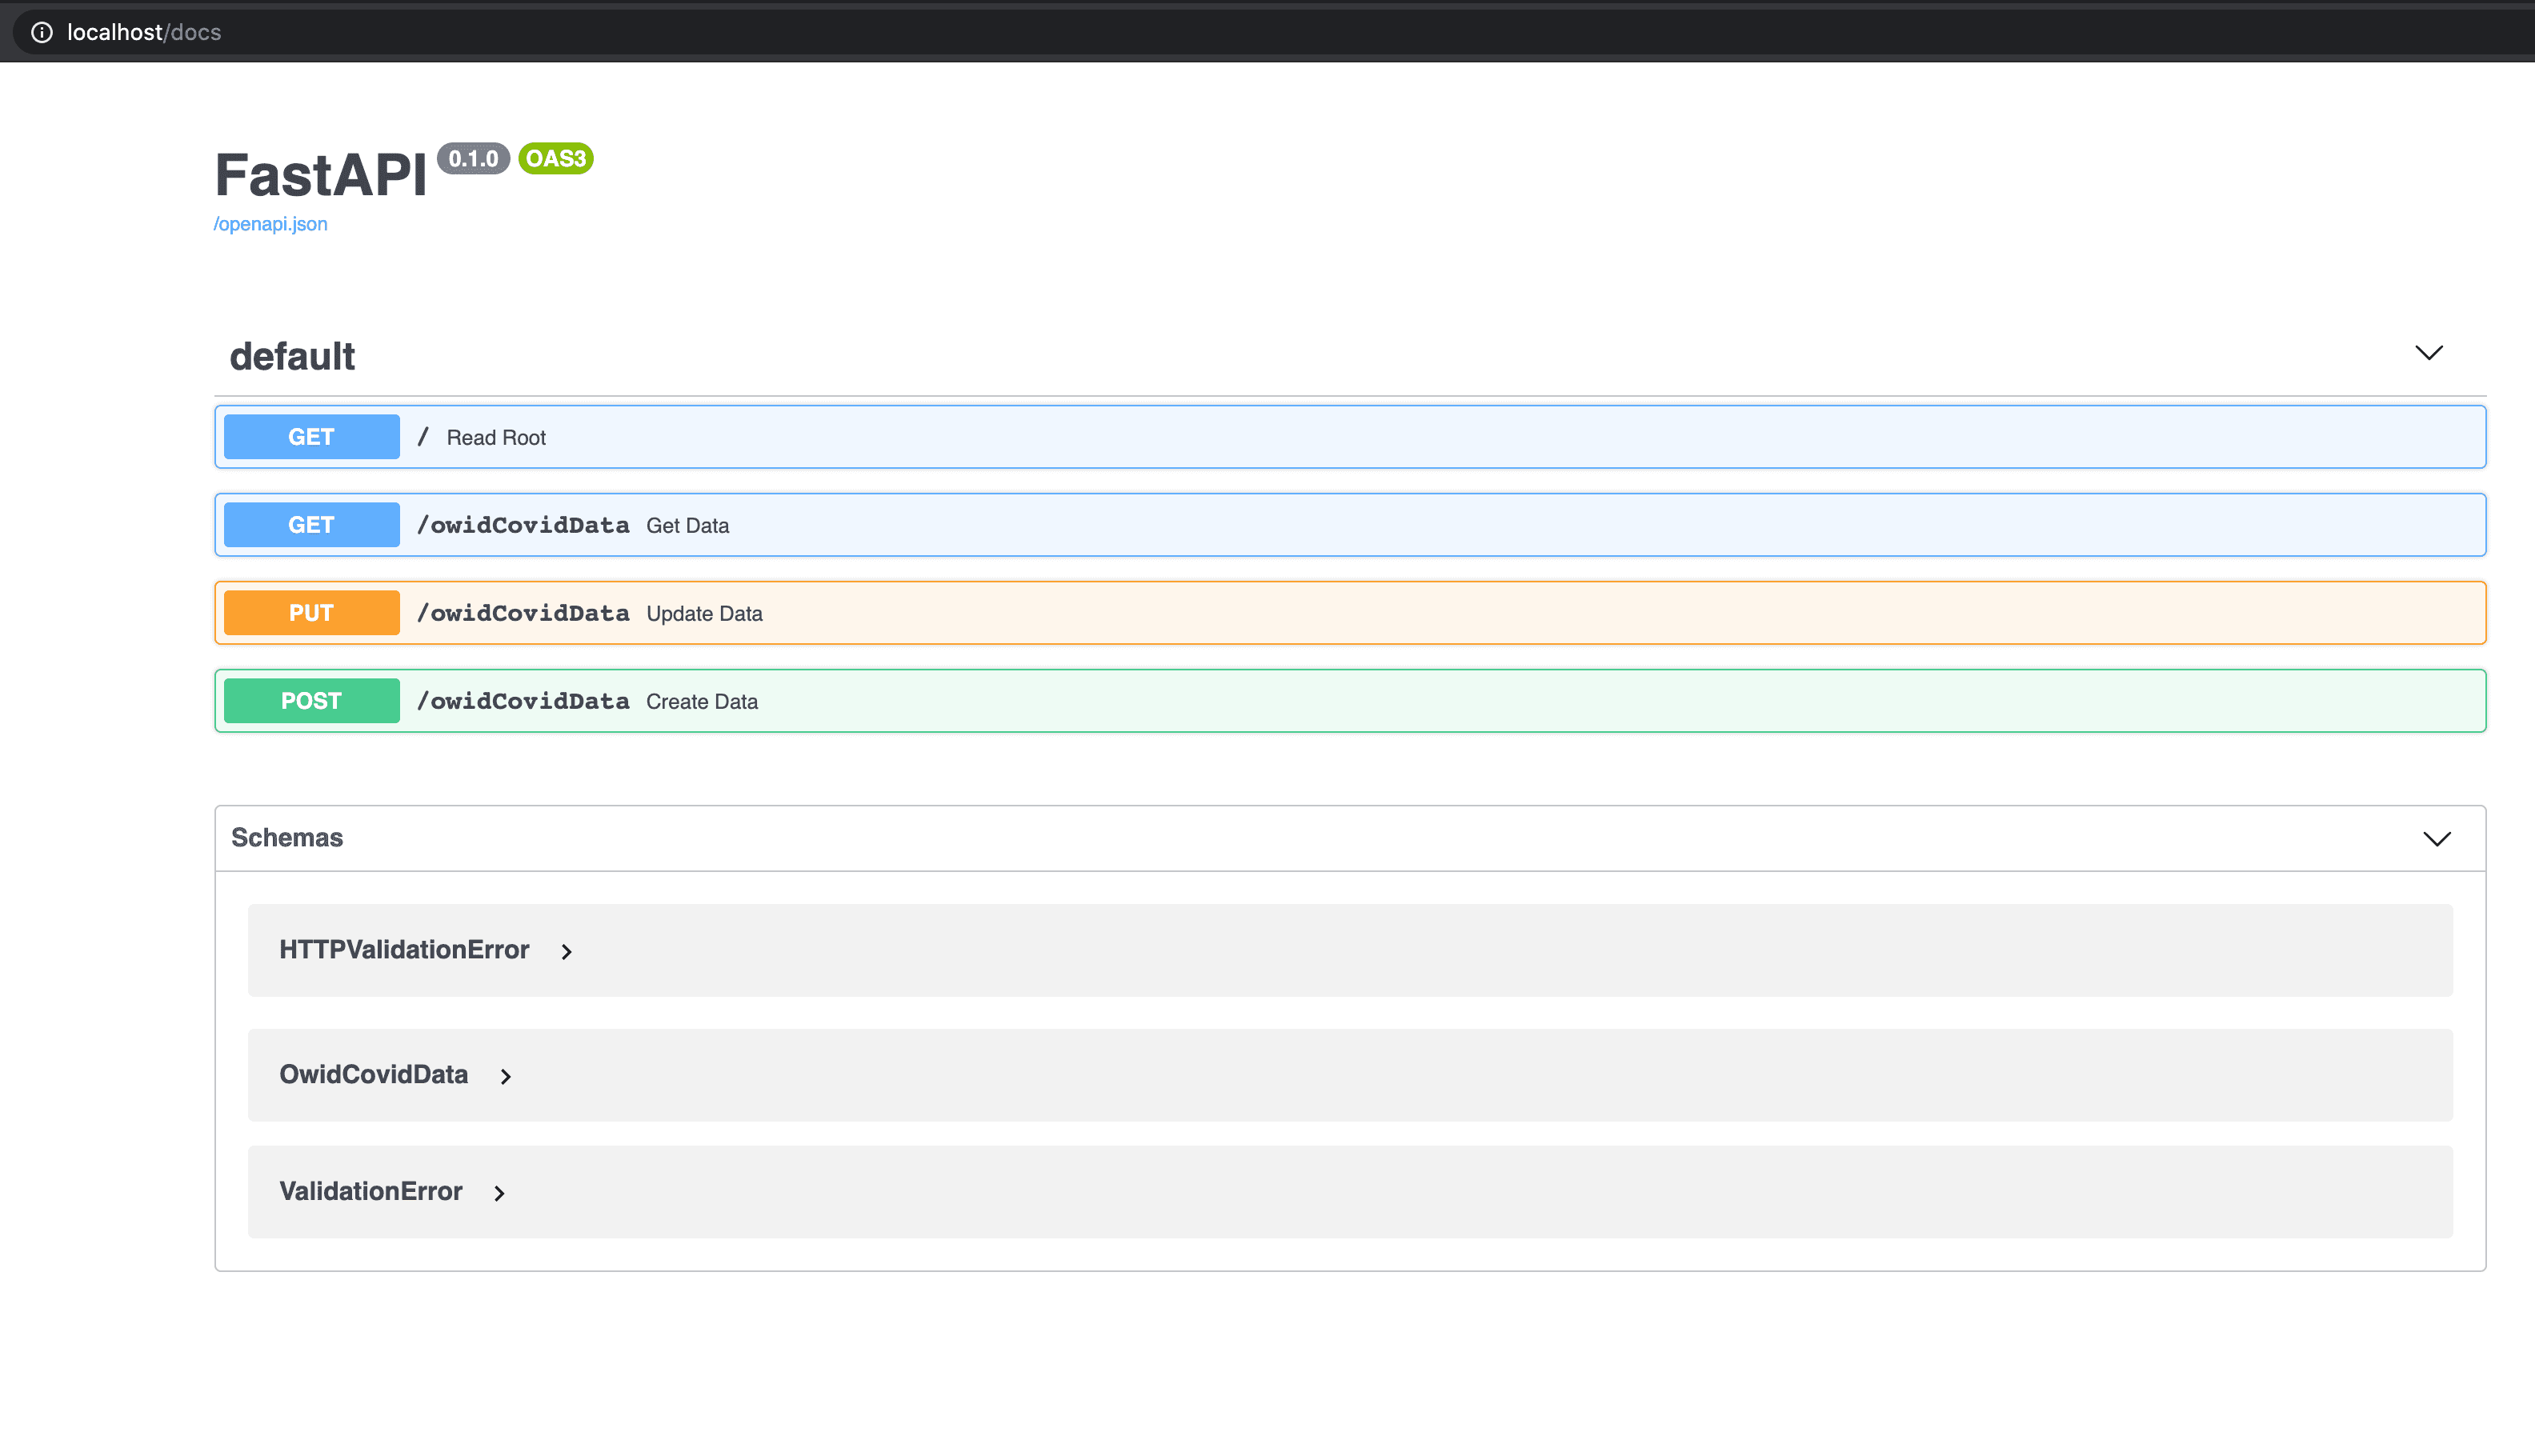
Even though we only wrote “localhost”, the browser actually executed the GET command on the URL http://localhost:80 which we defined as our root route. Port 80 is usually omitted by browsers. Let’s see if the automated documentation was generated. If you enter http://localhost/docs into the browser, you should get a result like this:
This is the most helpful advantage of having a framework. Based on having strict standards on our components, we can have a lot of external modules connected to our objects, like the whole API spec auto-generated and ready for sending over to possible clients, review and testing. The docs located on http://localhost/docs are SwaggerUI and on the link http://localhost/redoc you can find alternative documentation in ReDoc form. Let’s test the API. Our DB is already filled with data from our previous blog-post. We used DBeaver to communicate with the DB, so let’s find a record we want to confirm:
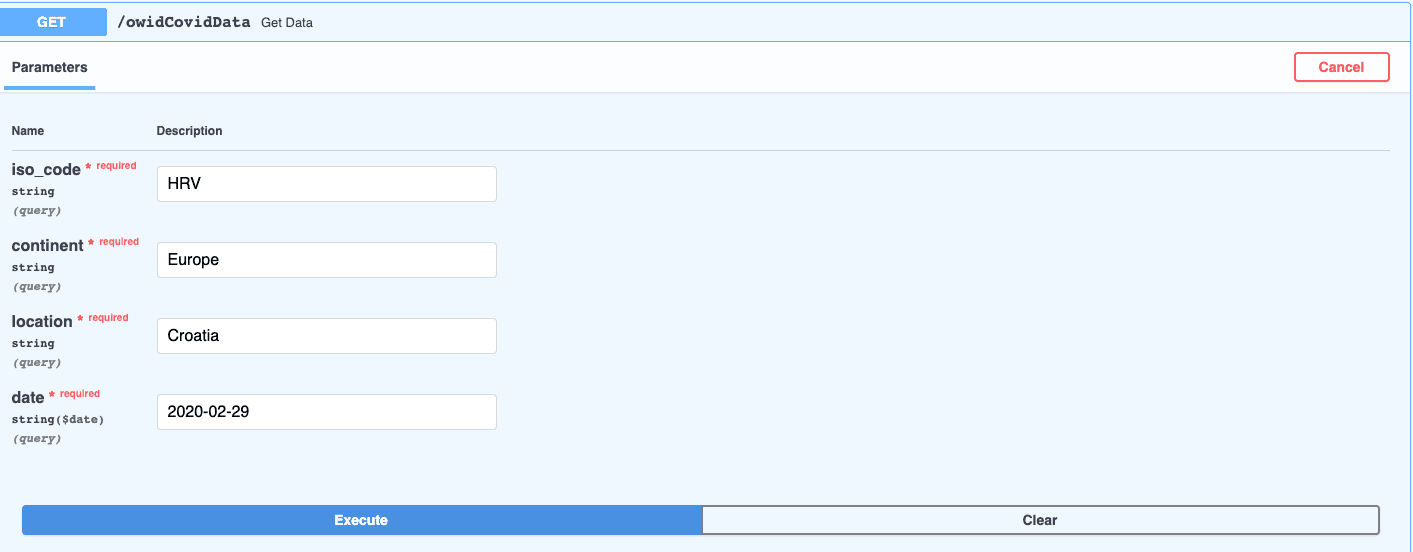
select * from owid_covid_data ocd where location='Croatia' and date='2020-02-29';Ok, total cases for that iso_code, continent, location and date are 5. Let’s try to test it over SwaggerUI. Click on the GET button marked /owidCovidData and then click on “Try it out”.
Enter the keys in the exact same way they are listed on the DB client (remember, we haven’t implemented any user-friendly data transformations) and press Execute:
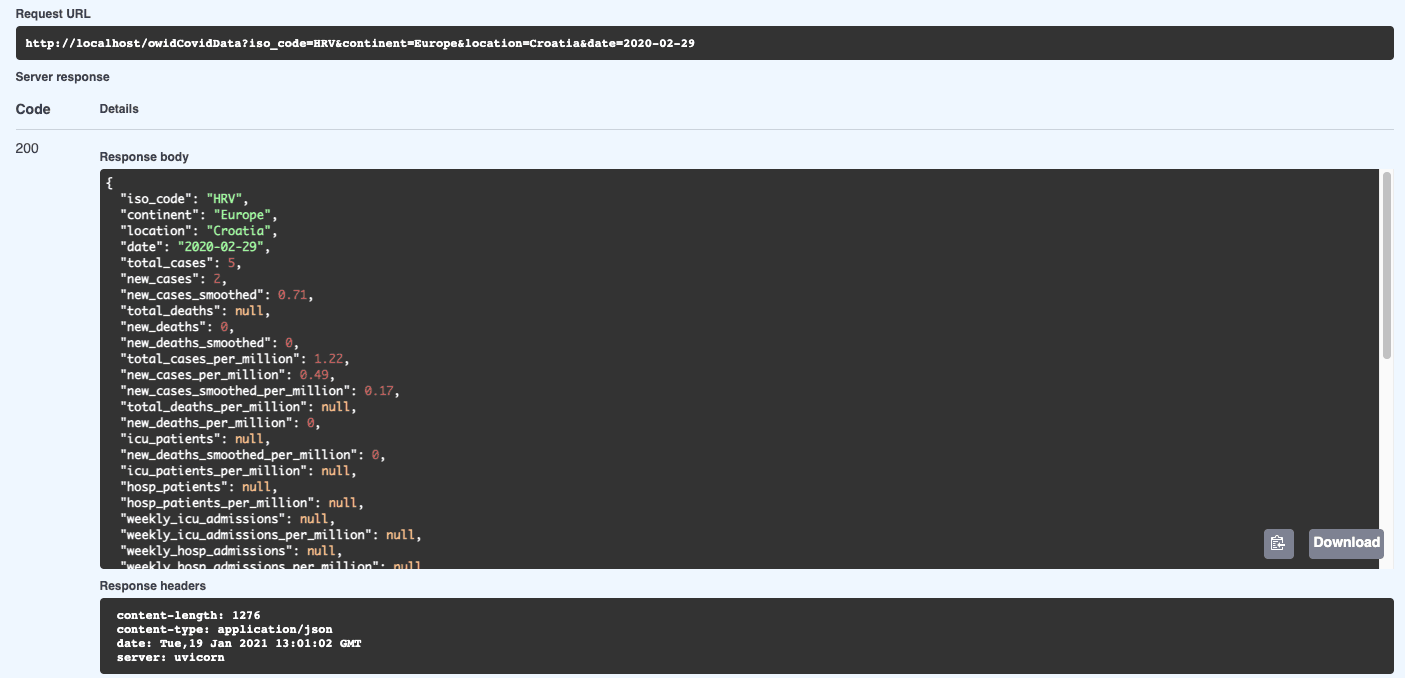
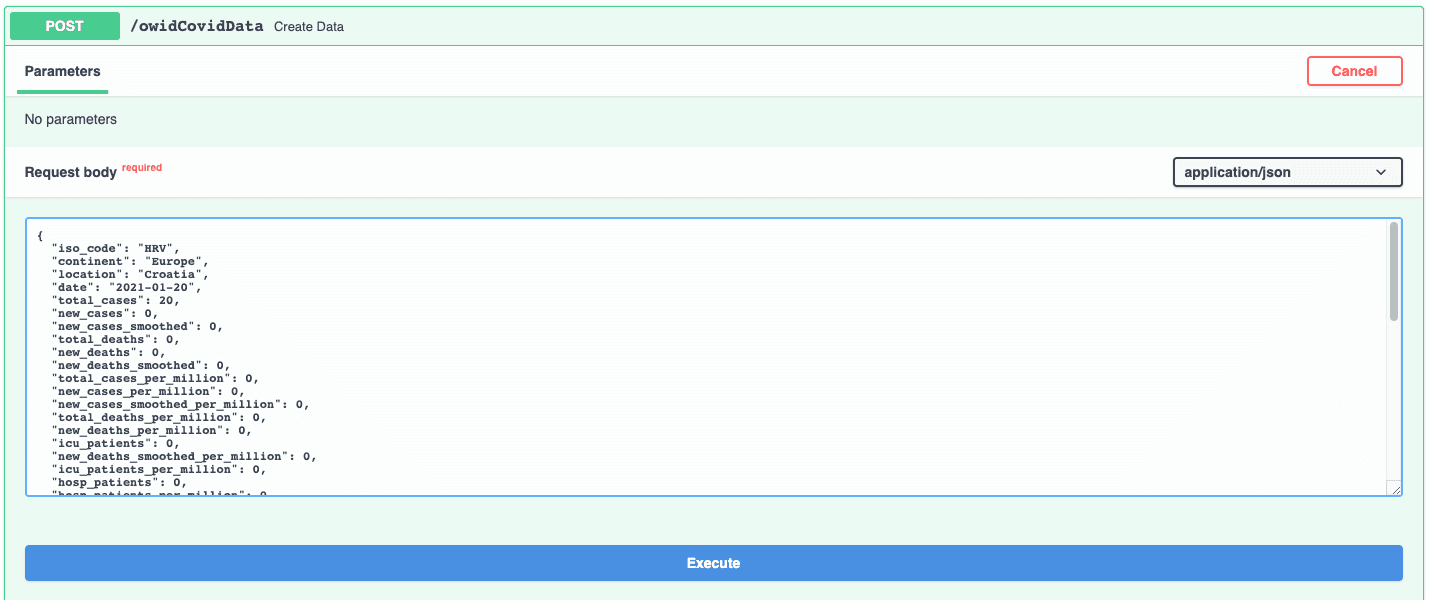
As you can see, we got the record with the total cases 5. Let’s try inserting a new record. We will insert Total cases 20 for Croatia on the 20th of January 2021.
Press execute and you should get the status OK just like we defined the output in the create method:
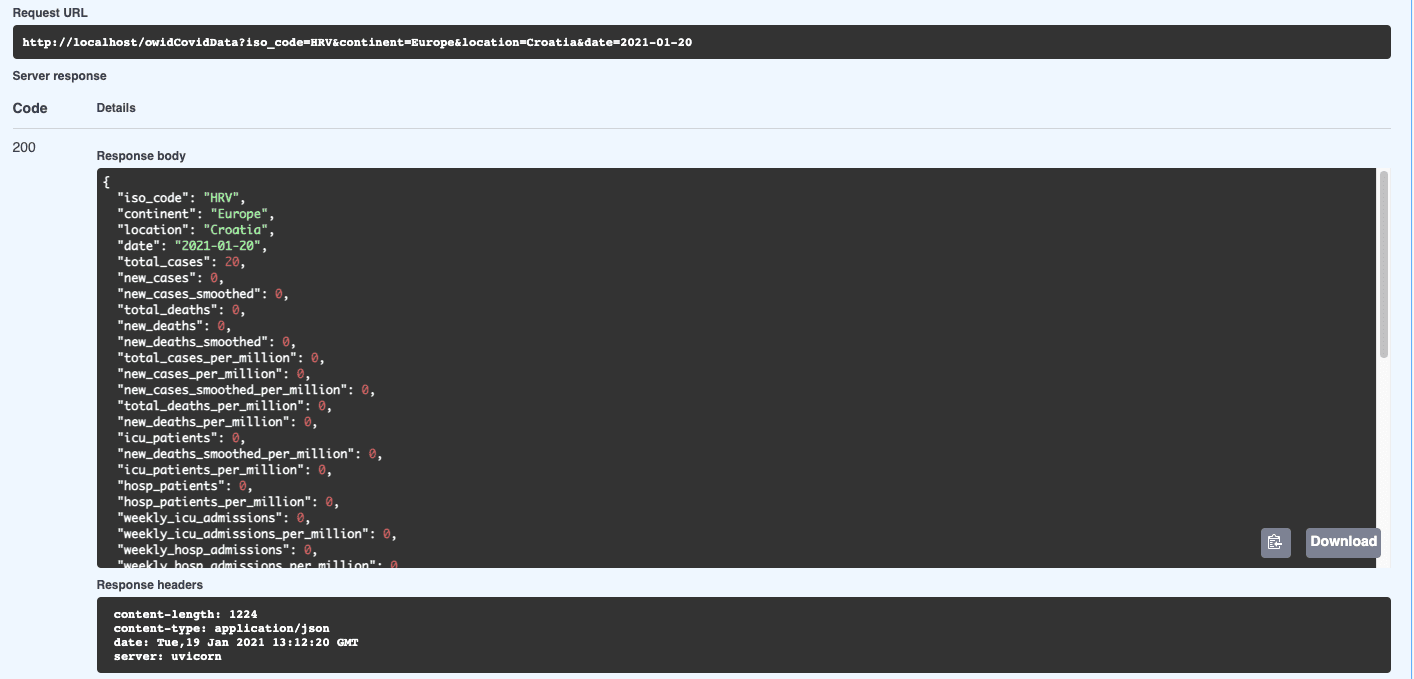
We should immediately see this record when running GET with the same parameters:
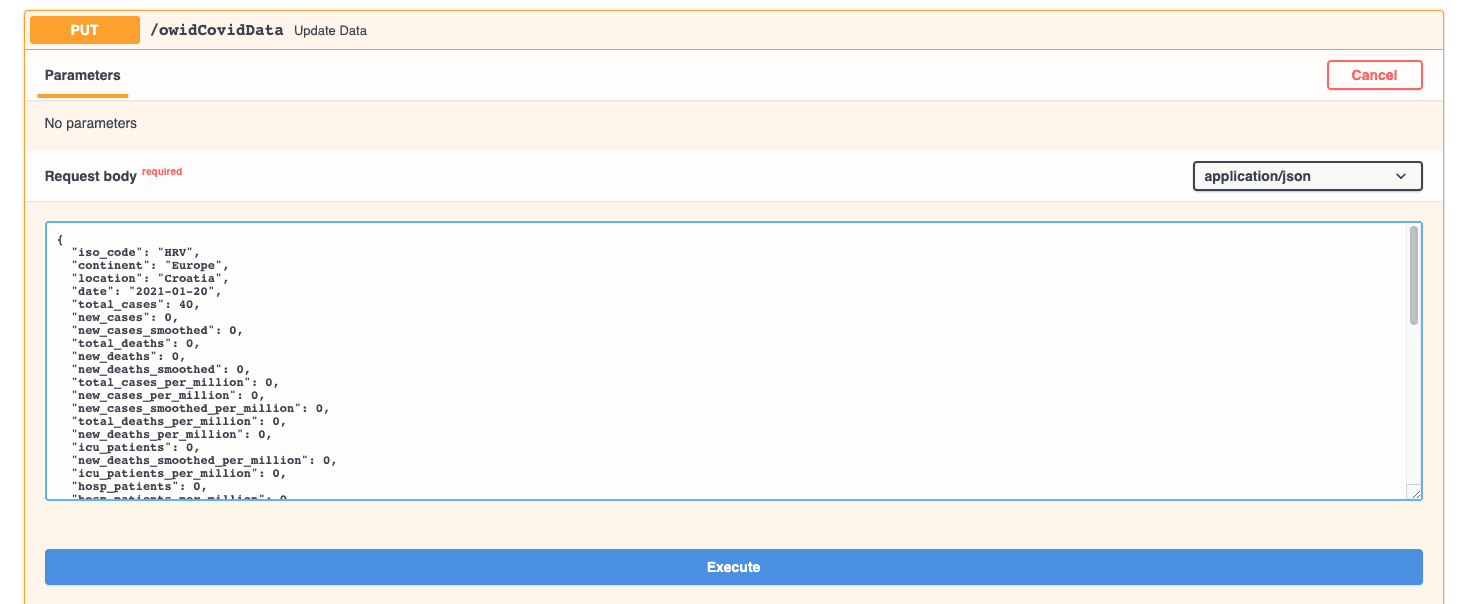
Finally, let’s try to update the same record. We will change the total cases to 40.
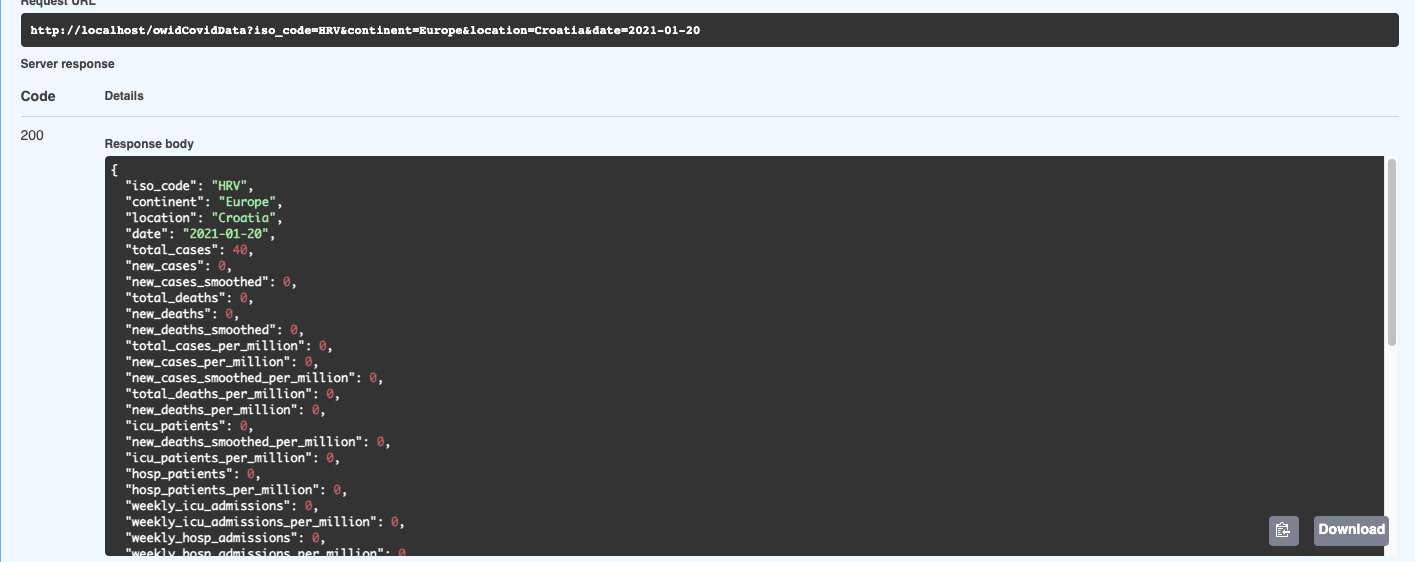
And if we check the record again by running the GET function:
We are getting the newly updated record with total cases 40.
Let’s recap what we learned from using a framework to build APIs:
Out of the box use of popular and tested database clients where we do not have to think about building mechanisms for communicating with the DB or writing async code
Out of the box use of a lightning fast, asynchronous web server
A standard (OpenAPI) for API creation, including declarations of path operations, parameters, body requests, security, etc.
Data validation
Automatic data model documentation
Integrated security and authentication
Full code is available on github.
Subscribe to our newsletter
We send bi-weekly blogs on design, technology and business topics.


