Mobile Automation for Beginners
Vedran Š.
2022-03-14
5min
QA
What is mobile automation testing? What is it needed for? Why is it interesting? How does it work? If these questions seem interesting, let’s try to answer them.


Share this blog:
Since more and more development is done for mobile applications there is a similar need for testing as there is for web apps. Web apps automation testing is well known for using different frameworks and technologies to perform automated tests. When it comes to mobile automation, there are several challenges to address: Different OSs and versions, different devices, different approaches to element selectors…
To address those challenges let’s take a look into Appium’s framework and its possibilities. What is Appium? Appium is an open-source, cross-platform test automation tool for native, hybrid, and mobile web apps, tested on simulators (iOS, FirefoxOS), emulators (Android), and real devices (iOS, Android, FirefoxOS). That means with Appium we can automate tests on any OS or device using any familiar language like Java, Python, Ruby…
Having this in mind, it is important to point out that here we will see what is needed for Android automation using Java.
How does it work? Let’s take a quick look into Appium architecture.
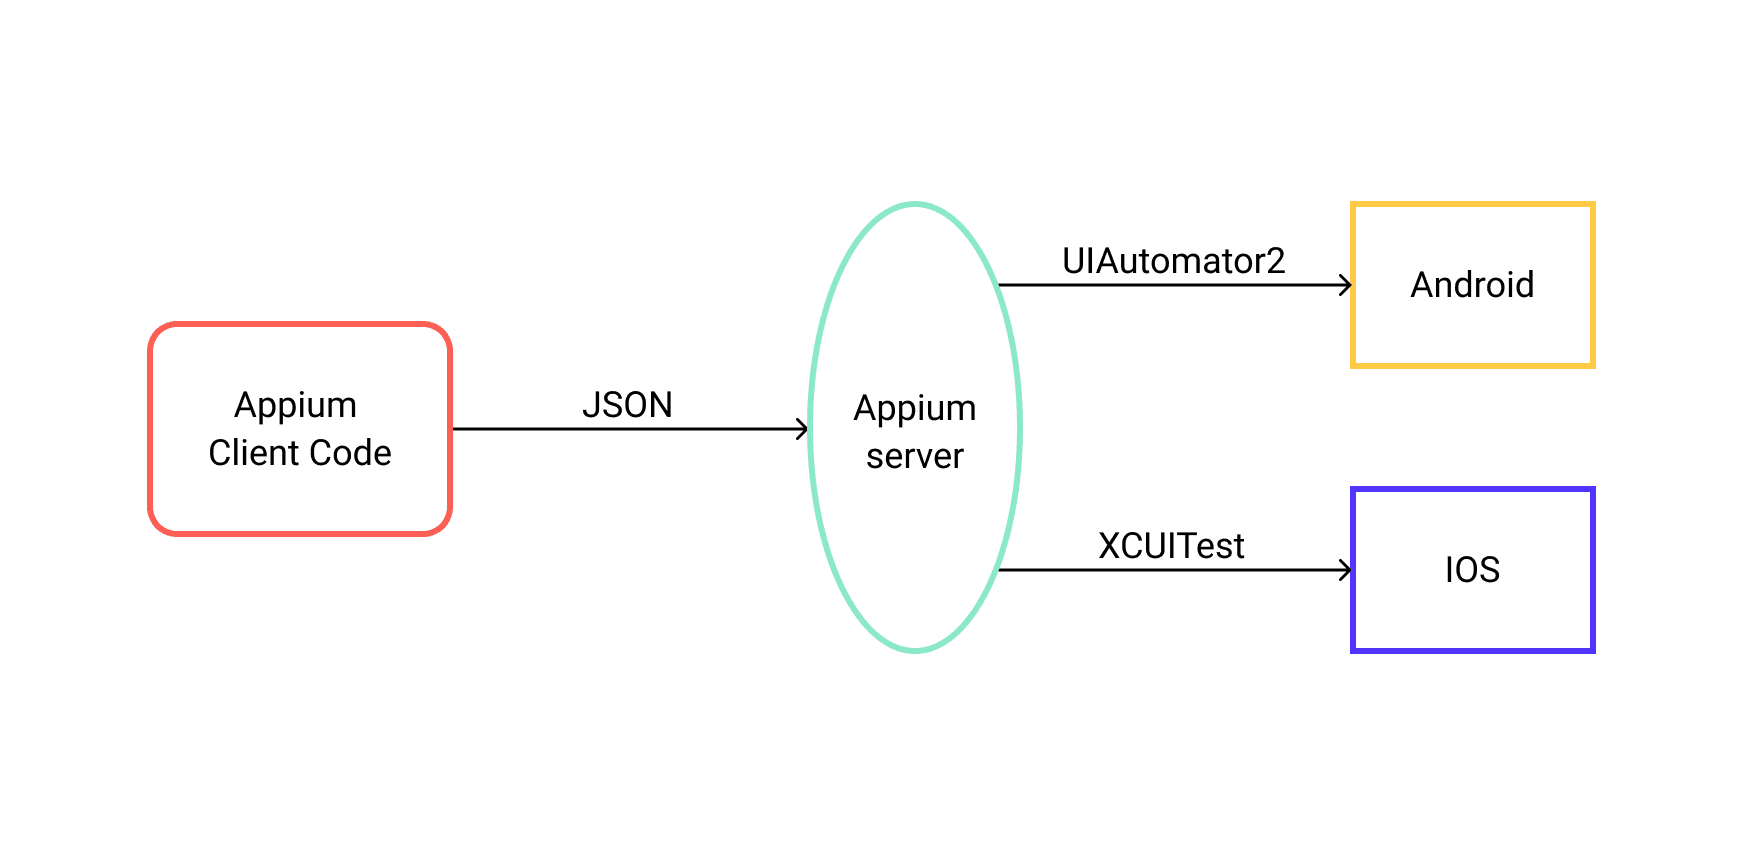
So, all our code will be sent via JSON into the Appium server that will then pack our code and deploy it to the Android or iOS device using the according channel.
Looks easy, right? Well, it is. So let’s see how to configure the environment for Appium to work.
Prerequisites:
First of all, we need to have Java installed. First tip here. Since a tool called UIAutomatorViewer is very needed, and we will get to it a bit later, it works nicely with Java 8 and 11. Later versions have some issues. So it is recommended to have Java 8 or 11 installed. If there is a newer version, either downgrade Java or install a second one in parallel. JAVA_HOME must be in PATH.
Next, we need a device. To start, a virtual device is recommended. For Android, it is called Emulator, and is created via Android Studio. So we need to download Android Studio and create a virtual device using Tools -> Device manager.
And finally, we need the Appium server. The Appium server is part of Node family, so the best option is to download Node.js and then, with a simple command:
“sudo npm install -g appium” in a Mac or
“npm install -g appium” in cmd opened as Admin in windows, install the Appium server.
Here is an example of PAHT when everything works. This one's for Mac, but similar needs to be in Windows:

The Appium server is started easily with command “appium” in terminal or cmd. When started it will show the port it is listening:

That means all our code needs to be routed to this port in order to be deployed properly on our device.
Let's start
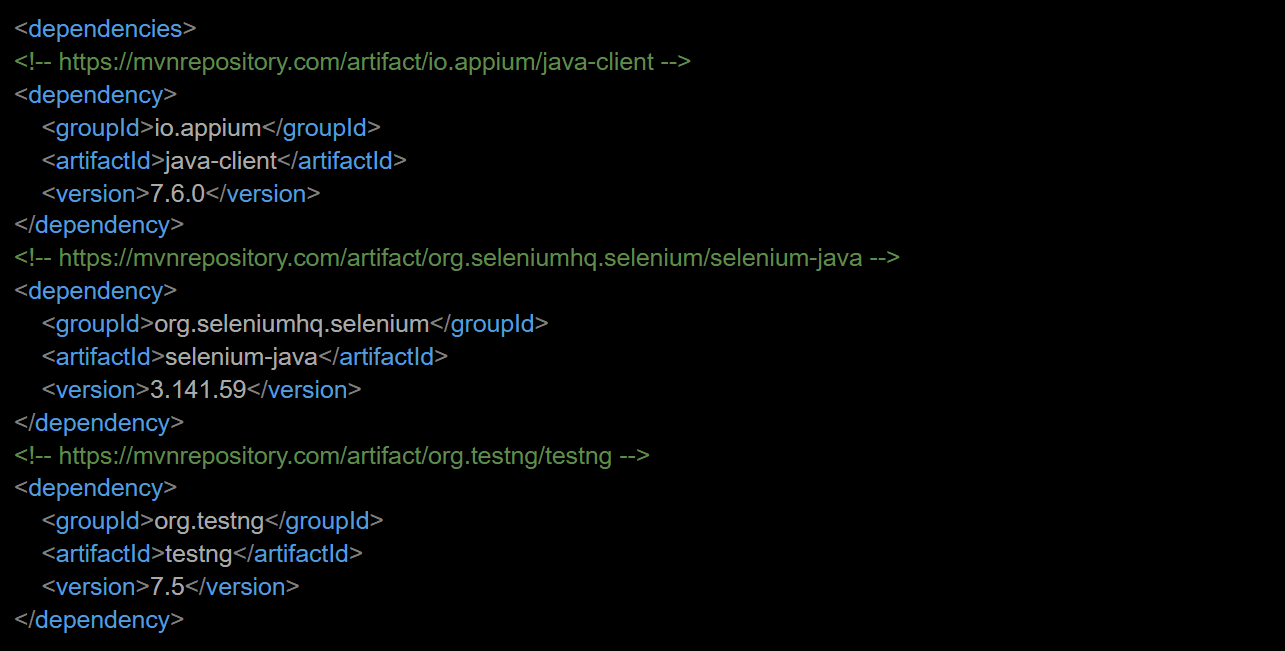
To start we need a tool. I use Eclipse, but any other tool for development is nice. Create Maven project and add the following dependencies in pom.xml:
After the build is complete, we can start.
First, we need to make sure we have an .apk file to install the app in the Emulator. This .apk needs to be in our project.
Next, we need to give the file, URL, device name, and automation name to the server in order to deploy our code as wanted. For this one class is crucial and is called DesiredCapabilities. Here is a sample code for preparing this part:
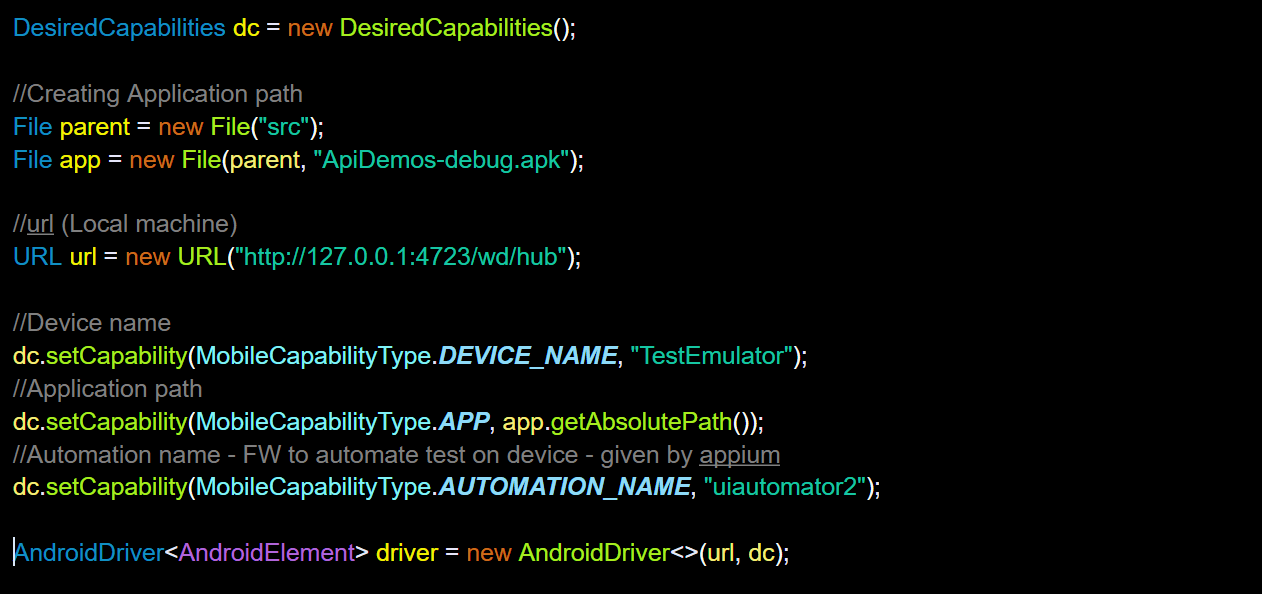
This driver will install the given ApiDemos-debug.apk in the TestEmulator using a local URL on port 4723 and start the application. If the application is already installed, it will just run it.
Great, but how do we get element selectors?
For selectors, we will use one tool I mentioned earlier. UIAutomatorViewer will give us the possibility to get selectors (xpath, id, …). To start UIAtomatorViewer all we need to do is give the simple command “uiatumatorviewer” in terminal or cmd. Tip here: often (not always) UIAutomatoViewer is not working properly if the appium server is running. So first stop the Appium server (ctrl+c). Another tip, for UIAutomatorViewer to be able to fetch elements, Emulator must be up and running, and the app needs to be opened on the desired screen because it works like a print screen fetching all the needed parameters from the app.
Short conclusion: Stop the appium server, open UIAutomatorVier and in the emulator go to the desired screen.
When opened UIAutomatorViewer will be empty and in the top left corner there will be a button to take Device Screenshot. Click on that button and it will be populated and look like this:
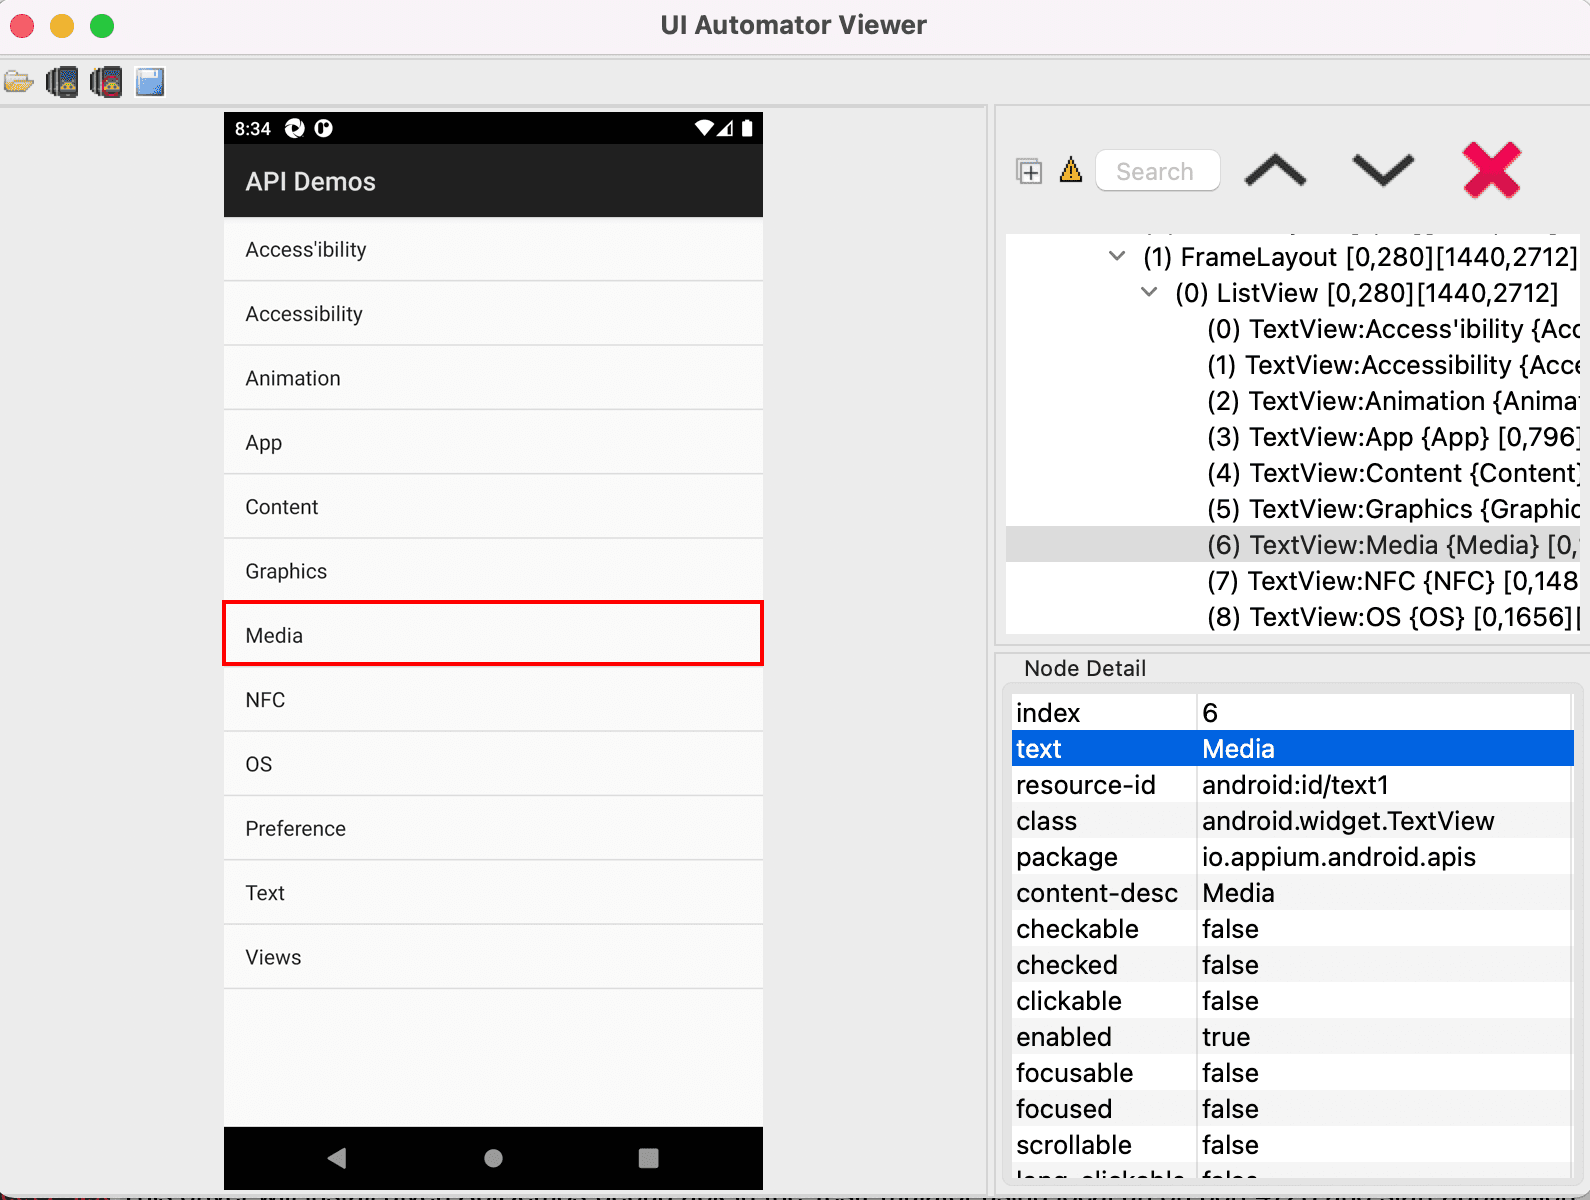
In the section “Node Detail” are all the parameters for the selected element. From here we can start creating a unique selector based on different parameters. One example here: To click on the “Media” field we would create code like this:

To run the test use the “Run as -> Java application” option. Check the Emulator and enjoy….
After running the test in Emulator, and some more practice with selectors and options, it is time to try out the test on a real device. How to do that? The first device is needed and a cable to connect it to the PC. Once it is connected, the developer option needs to be activated on the phone, and in settings “Install via USB” must be enabled. When the PC recognizes the device, the only thing that needs to be changed is one option in code and that is the device name. What to put there? Here is an example:
Change:

into:

and run it the same way as on the Emulator.
Et voila. Your first automated action is here. From here on out the sky’s the limit.
So happy coding and happy testing knowing that the best test is the one that fails for a reason :)
Share this blog:
Subscribe to our newsletter
We send bi-weekly blogs on design, technology and business topics.